








Table of Contents
- Diagnose Your Toilet Flush Problem
- Tools You’ll Need for DIY Toilet Repair
- How to Fix a Weak Toilet Flush
- Replacing a Toilet Syphon: Step-by-Step
- Troubleshooting a Constantly Running Toilet
- Clearing Blockages in the Trapway
- When to Call a Professional Plumber
- Frequently Asked Questions
Last Updated: September 7, 2026
A toilet that flushes poorly is frustrating, yet most causes are simple to fix without calling anyone out. This guide covers the most frequent culprits, the tools you need, and the exact steps to put things right, plus when to call a professional.
Toilet flush problems fall into three categories: a weak flush, a constantly running toilet, or a flush that does nothing. Around nine out of ten issues trace back to a handful of components inside the cistern, all cheap to replace and straightforward to work on.
Diagnose Your Toilet Flush Problem
Before lifting the cistern lid, identify which flushing mechanism you have; the fix differs completely between a syphon unit and a flush valve.
Step 1: Identify your cistern mechanism
Open the lid and look:
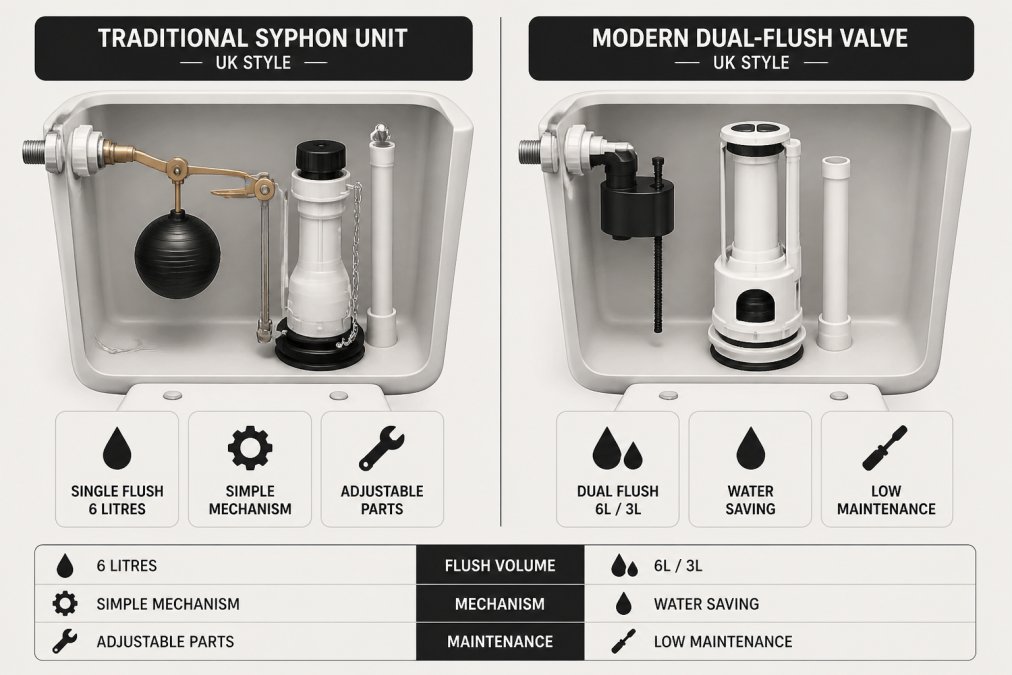
- Syphon unit (common in toilets installed before the mid-1990s): A tall plastic or brass tower with a large diaphragm at the base. It has a wide rubber flap or a metal/plastic lever arm connecting to the handle. When you flush, water is pulled up and over the top of the tower.
- Flush valve (standard in modern dual-flush toilets): A flat, wide rubber seal (flapper) or a vertical canister that lifts straight up off a seat. Dual-flush models have two buttons on the lid.
Step 2: Match your symptom to the mechanism
Use the table below to narrow the fault. Do not skip this step; it prevents you from buying the wrong replacement part.
| Symptom | Likely Cause (Syphon Unit) | Likely Cause (Flush Valve) |
|---|---|---|
| No water enters bowl | Diaphragm split or lever arm detached | Lift chain broken or disconnected from handle |
| Weak, slow flush | Diaphragm perished; water level too low | Flapper closes early; rim jets blocked |
| Water runs continuously | Diaphragm not seating; overflow pipe issue | Flapper seal warped or debris trapped under it |
| Flush only works when handle held down | Diaphragm spring weak; lift rod misaligned | Lift chain too slack; flapper buoyancy failing |
| Dual-flush button sticks or feels spongy | Not applicable, syphons are single-flush | Fill valve float stuck; button mechanism jammed |
Step 3: Check the water level
The water line should sit approximately 25 mm below the top of the overflow tube. If lower, the flush lacks volume; if higher, water spills down the overflow, a common cause of a running toilet.
Step 4: Perform the tissue test
For a suspected leak between cistern and bowl, dry the inside of the bowl with toilet paper, then wait five minutes without flushing. If fresh water appears on the paper, the flush valve seal or syphon diaphragm is leaking. This test isolates a cistern fault from a supply-line issue.
Take a photo of the inside of your cistern before you disconnect anything. Manufacturers such as Ideal Standard, Vitra, and Thomas Dudley print part numbers on the syphon or valve body; a clear photo helps you or a plumber identify the exact replacement kit without guesswork.
If your symptom does not match any row above, or if you have a concealed cistern with no visible access panel, stop here and call a professional. Concealed frames (such as Geberit or Grohe) require different disassembly and are easy to damage.
Tools You’ll Need for DIY Toilet Repair
Most DIY toilet repairs require only basic tools you likely already own. Having everything ready before draining the cistern avoids repeated trips to the hardware shop.
- Adjustable spanner or pliers
- Flathead and crosshead screwdrivers
- Bucket and old towels
- Replacement syphon or flush valve kit
- Plunger with a folded flange
- Toilet auger for stubborn blockages
A common mistake is buying a generic repair kit without checking whether your cistern uses a syphon mechanism or a flush valve. Toilets built before the 1990s commonly use a syphon, while modern dual-flush designs almost always use a flush valve. The Water Efficient Toilets guide from Water UK explains the difference and helps you identify which system you have before ordering parts.
How to Fix a Weak Toilet Flush
A weak flush means the cistern is not delivering enough water, or the bowl’s channels are restricted. Confirm whether you have a syphon or a flush valve before starting.
Step 1: Restore the correct water level
Check the water line; it should sit roughly 25 mm below the top of the overflow tube. If low, adjust the fill valve:
- Diaphragm-type fill valve (brass or plastic with a float on a metal arm): Bend the float arm down slightly to raise the water level, or turn the adjustment screw at the valve head.
- Cable or float-cup fill valve (modern plastic units): Slide the clip or turn the screw on the top of the valve to raise the float cup.
Turn the isolation valve clockwise to shut off water before adjusting, then flush to empty the cistern. Make small adjustments; a 5 mm change in float height alters the water level noticeably.
Step 2: Clear the rim jets and siphon jet
Limescale narrows the small holes under the toilet rim, reducing the flushing swirl. Use a small screwdriver or bent paperclip to clear each hole. Then tackle the siphon jet at the base of the bowl trapway; a build-up here weakens the pull that clears waste.
Pour a bucket of water (about 5 litres) into the bowl to flush debris through. For stubborn limescale, apply a porcelain-safe descaling product, leave it as directed, then scrub and flush.
Step 3: Fix the syphon unit (pre-1990s toilets)
If the water level is correct and the rim jets are clear, the syphon diaphragm is likely perished; it is not lifting enough water.
- Shut off the water supply and flush to drain the cistern.
- Disconnect the flush handle lever arm from the syphon.
- Undo the large plastic retaining nut underneath the cistern.
- Lift the syphon out and inspect the diaphragm; if it is warped, cracked, or has lost its shape, replace the entire syphon unit.
Do not attempt to replace only the diaphragm on an old syphon. The plastic ages and becomes brittle; fitting a new diaphragm into a worn housing often leaks within weeks. Replace the complete syphon unit for a reliable seal.
Step 4: Fix the flush valve (modern toilets)
For a flush valve, a weak flush usually means the flapper closes before the cistern empties. Check the lift chain: it should have about 10 mm of slack when the handle is at rest. Too tight lifts the flapper only partially; too slack drops it early.
If the chain is correct, check the flapper. One that has lost buoyancy, due to waterlogged foam or a cracked hinge, closes prematurely. Replace it with a universal kit matching your valve seat diameter (commonly 2 or 3 inches in cisterns).
Step 5: Preserve dual-flush efficiency
If your toilet has dual-flush buttons, do not sacrifice the water-saving setting. After any repair, test the short flush: it should clear liquid waste using approximately 3 litres, while the full flush delivers around 6 litres. If too weak, adjust the valve’s flush-volume limiter rather than disabling the dual-flush function.
Step 6: Test and verify
Refill the cistern and flush. A healthy flush creates a vortex that clears the bowl in one motion. If still weak, the issue may be a partial blockage in the trapway or soil pipe; move to the clearing blockages section below.
Replacing a Toilet Syphon: Step-by-Step
If your toilet uses a syphon mechanism and the flush is weak or non-existent, replacing the syphon is a manageable DIY job.
Step 1: Turn off the water supply. Locate the isolation valve on the water supply line and turn it clockwise to shut off the water.
Step 2: Drain the cistern. Flush the toilet to empty the cistern, then sponge out any remaining water. Place towels underneath to catch drips.
Step 3: Disconnect the flush handle. Remove the nut holding the handle mechanism to the cistern, then detach the lever arm from the syphon.
Step 4: Remove the cistern from the pan. Undo the nuts securing the cistern to the wall or the pan connector. Lift the cistern off carefully and set it on a flat surface.
Step 5: Replace the syphon. Unscrew the large retaining nut underneath the cistern and pull the old syphon out. Fit the new one, ensuring the overflow connection is secure, then reassemble in reverse order.
Step 6: Test the flush. Turn the water back on, let the cistern refill, and flush several times to confirm a strong, complete flush.
Do not overtighten the plastic retaining nut on the syphon base. It seals against a rubber washer, and excessive force cracks the nut or the cistern base, causing a leak that damages flooring.
Troubleshooting a Constantly Running Toilet
A constantly running toilet wastes a surprising amount of water. The cause is almost always water leaking from the cistern into the bowl because the flush valve is not sealing.
Step 1: Check the flapper valve. Lift the lid and look at the flapper or flush valve seal. If it is warped, cracked, or covered in mineral buildup, it will not seat properly. Clean it with vinegar or replace it if damaged.
Step 2: Adjust the lift chain. A chain that is too tight holds the flapper slightly open, causing a continuous leak. A chain that is too slack prevents a complete flush. Aim for a small amount of slack when the handle is at rest.
Step 3: Inspect the fill valve. If the water level rises too high and spills down the overflow tube, the fill valve is not shutting off at the correct level. Adjust the float so the water stops below the overflow.
Step 4: Check the overflow tube. If water runs down the overflow tube itself, the fill valve is faulty or the float is set too high. Replace the fill valve if adjustment does not solve it.
Clearing Blockages in the Trapway
When the bowl fills but drains slowly or not at all, the blockage sits in the trapway, the curved channel at the base of the toilet. A plunger resolves most blockages, but stubborn clogs need an auger.
Start with the plunger. Position it over the drain opening to form a seal, then push and pull firmly. If the water level drops and the toilet flushes normally, the blockage has cleared.
For stubborn clogs, use a toilet auger. Feed the cable into the trapway and rotate the handle to break up or hook the obstruction. Work slowly to avoid scratching the porcelain, then flush several times to confirm the pipe is clear.
When to Call a Professional Plumber
Not every toilet problem suits a DIY fix. Call a professional when you have tried the steps above and the issue persists, or when you spot any of the following:
- Water pooling around the base of the toilet, indicating a failed wax seal or cracked pan
- Persistent blockages that return within days
- Multiple toilets or drains backing up at once, suggesting a main drain issue
- Signs of a leak through ceilings below the bathroom
- You are unsure which mechanism your cistern uses or feel uncomfortable working on it
For homeowners in Sussex and Surrey, Apex Gas & Heating Ltd offers a fast, 24/7 emergency call-out service for plumbing issues that cannot wait. Our team carries full public liability insurance and provides transparent pricing, so you know the cost before work begins. We also handle landlord gas safety certificates and broader property maintenance for landlords managing multiple rental properties.
If your toilet still misbehaves after checking the water level, flapper, and lift chain, stop and call a professional. Repeated DIY attempts on a persistent fault risk damaging the cistern or creating a leak that costs far more than a call-out fee.
Toilet flush problems are rarely as serious as they first appear, and most homeowners can resolve a weak flush or running toilet in under an hour with basic tools. The key is diagnosing the cause correctly before buying parts. When the fault sits beyond the cistern, professional help saves time and prevents costly water damage. Get in touch with Apex Gas & Heating Ltd for reliable plumbing services.
Frequently Asked Questions
What are the most common causes of toilet flush problems?
The most common toilet flush problems stem from a faulty flapper valve or syphon, a broken or loose lift chain, a blocked trapway, or an incorrectly adjusted water level in the cistern. A constantly running toilet is often due to a worn flapper or a fill valve that needs adjusting. Start by removing the cistern lid and observing the mechanism during a flush to identify the failing part.
Can I fix a weak toilet flush without calling a plumber?
Yes, many causes of a weak toilet flush are simple DIY repairs. Start by checking the water level in the cistern; it should be about 25mm below the top of the overflow tube. If it’s low, adjust the fill valve. Next, inspect the lift chain for slack or snags. If the flush is still weak, the issue is often a blocked trapway or rim jets, which you can often clear with a plunger or by using a wire coat hanger.
How do I know if my toilet is ghost flushing?
A ghost flush is when your toilet refills periodically without anyone using it. This usually happens because water is slowly leaking from the cistern into the bowl, often due to a worn flapper valve or syphon seal. To check, place a few drops of food colouring in the cistern and wait 15-20 minutes without flushing. If colour appears in the bowl, you have a leak that needs fixing.
When should I call a professional plumber for toilet issues?
You should consider calling a professional plumber when you’ve tried basic troubleshooting and the problem persists, or if you notice signs of a larger issue. This includes persistent leaks around the toilet base, cracks in the porcelain, or a constantly running toilet that new parts don’t fix. If you’re unsure about the cause, or if the repair involves moving the toilet to access the soil pipe, professional help prevents costly mistakes.