








Table of Contents
- Identify Your Tap Type Before You Start
- What You’ll Need: Tools and Materials
- Isolate the Water Supply
- How to Fix a Leaking Kitchen Tap: Remove and Inspect
- Kitchen Tap Cartridge Replacement
- Replace Tap Washer and Kitchen Tap O-Ring Replacement
- Reassemble the Tap and Test for Leaks
- Plumber Cost for Leaking Tap UK: When to Call a Professional
Last Updated: August 2, 2026
Most kitchen tap leaks stem from worn internal components that are straightforward to replace with basic tools and patience. At Apex Gas & Heating Ltd, we’ve guided countless customers through this repair, and understanding your tap type before you start makes the entire process significantly faster and less frustrating.
A leaking kitchen tap wastes thousands of litres of water annually and drives up utility bills. The good news is that fixing a leaking kitchen tap doesn’t require specialist qualifications, most repairs take between 30 and 90 minutes once you’ve gathered the right tools and identified which components need replacing.
Identify Your Tap Type Before You Start
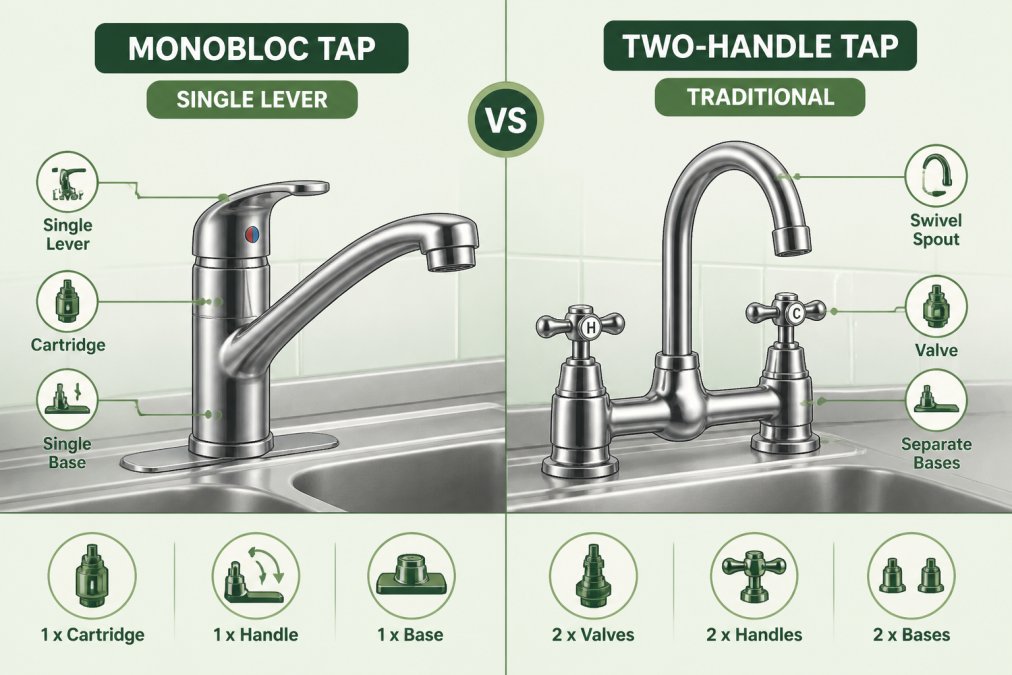
Before you purchase replacement parts, you need to know what kind of tap you’re working with. The three main categories, monobloc, traditional two-handle, and cartridge-based systems, require different approaches and use different internal components.
Monobloc vs. Traditional Taps: Visual Identification
A monobloc tap has a single spout where both hot and cold water are controlled by one lever or knob. A traditional tap has two separate handles, one for hot water and one for cold. The visual difference is immediately obvious: monobloc taps look unified and minimalist, while traditional taps have a separated, vintage appearance. If unsure, look at your tap from above. One control mechanism means monobloc; two distinct handles means traditional.
Ceramic Disc, Compression, and Cartridge Systems
Ceramic disc cartridges are found in most modern monobloc taps. Inside the tap body sits a cylindrical cartridge containing two ceramic discs that rotate to control water flow and temperature. When these discs wear down, water leaks through even when the tap is fully closed. Ceramic disc cartridges typically last 10-15 years.
Compression taps use rubber washers and metal valve seats to create a watertight seal. When you turn the handle, a spindle presses the rubber washer against the valve seat, stopping water flow. Over time, the rubber washer hardens and cracks, allowing water to seep past. These taps are common in older homes and are the most affordable to repair, a new washer costs just a few pounds.
Cartridge systems are hybrid designs found in some monobloc and traditional taps. They use a replaceable cartridge containing multiple sealing surfaces. To identify which system you have, look at the tap handle. If it moves smoothly in all directions without clicking, you likely have a ceramic disc cartridge. If the handle has distinct stopping points or requires more force to turn, it’s probably a compression system.
What You’ll Need: Tools and Materials
Gathering the right tools before you start prevents frustrating mid-repair trips to the hardware shop.
Essential tools:
- Adjustable wrench or spanner
- Hex key set (Allen keys)
- Flathead and Phillips head screwdrivers
- Plumber’s grease or silicone lubricant
- Towels or rags and bucket for water spillage
- Torch or headlamp for visibility
Materials you may need:
- Replacement ceramic disc cartridge (£35-60)
- Replacement rubber washers (£3-10 for assorted sets)
- Replacement O-rings (£3-5 for assorted sets)
- PTFE tape (plumber’s tape)
- Penetrating oil for stuck parts
Most replacement parts cost under £15, with genuine ceramic disc cartridges at the higher end.
Tool Compatibility Guide for Different Tap Types
For monobloc taps: You’ll primarily need hex keys and a flathead screwdriver. Most monobloc handles are secured with a single hex bolt hidden under a decorative cap.
For traditional two-handle taps: Adjustable wrenches become more important because traditional taps have larger nuts and bolts. The handle spindle is often secured with a nut underneath the sink.
For cartridge systems: Hex keys are usually sufficient, though some cartridges require a specific removal tool (often included with the replacement cartridge).
Invest in a good adjustable wrench and a complete hex key set, these two tools alone will handle 90% of tap repairs. A quality wrench costs £15-25 and will last decades.
Isolate the Water Supply
Before you dismantle anything, shut off the water supply to your kitchen tap.
Locate the isolation valves under your sink on the hot and cold water pipes. Turn both valves clockwise until they stop. After closing the isolation valves, turn on the tap and let any remaining water drain out. This depressurises the system and confirms the valves are working.
Once water has stopped flowing, place a bucket or towel under the tap to catch residual water trapped in the tap body.
If your isolation valves won’t turn or water continues flowing after you’ve closed them, stop immediately and call a professional. Attempting to repair a tap without proper water isolation can cause flooding.
How to Fix a Leaking Kitchen Tap: Remove and Inspect
With the water supply isolated, you can now safely begin dismantling the tap.
Removing the Tap Handle and Accessing the Cartridge
Start by removing the decorative cap on the tap handle using a flathead screwdriver. Once the cap is removed, you’ll see a hex bolt or screw underneath. Use the appropriate hex key or screwdriver to loosen this bolt by turning it counterclockwise.
After removing the handle, you’ll see the tap body more clearly. For monobloc taps, the ceramic disc cartridge sits directly under the handle. For traditional taps with compression systems, you’ll see a larger nut that secures the spindle assembly. Use your adjustable wrench to loosen this nut by turning it counterclockwise.
As you loosen components, water will drip into your bucket. Keep loosening until you can gently pull out the cartridge or spindle assembly. If it’s stuck, apply penetrating oil around the edges and wait 15 minutes before trying again.
Take a photo of the removed component before cleaning it. This photo will be invaluable if you need to order a replacement.
Kitchen Tap Cartridge Replacement
If your tap uses a ceramic disc cartridge, this is likely the source of your leak.
When to Replace vs. Clean the Ceramic Disc Cartridge
Before you automatically buy a replacement, try cleaning the cartridge first. Sometimes mineral deposits prevent the discs from sealing properly, and a thorough clean restores function without needing a new part.
Remove the cartridge completely and examine the ceramic surfaces. If they look smooth and undamaged, soak the cartridge in white vinegar for 30 minutes to dissolve mineral buildup, then gently scrub with a soft brush. Rinse thoroughly and reinstall. If the leak stops, you’ve saved £40-60.
However, if the ceramic surfaces are visibly cracked, pitted, or discoloured, the cartridge must be replaced. Damaged ceramic cannot be restored.
To order the correct replacement cartridge, find the tap manufacturer’s name and model number (usually printed on the tap body). Search online for "[Manufacturer] [Model] ceramic disc cartridge." Genuine cartridges cost £35-60, while compatible aftermarket versions cost £15-25.
Once your replacement arrives, slide the new cartridge into the tap body, ensuring the inlet and outlet ports align correctly. Reinstall the spindle assembly, handle, and decorative cap in reverse order. Test the tap carefully by turning on the water supply and checking for leaks around all connection points.
Most ceramic disc cartridge leaks are caused by mineral buildup rather than physical damage. A 30-minute vinegar soak often solves the problem without needing to buy a replacement part.
Replace Tap Washer and Kitchen Tap O-Ring Replacement
If your tap uses a compression system, the leak is almost certainly caused by a worn rubber washer, damaged O-ring, or pitted valve seat.
Identifying Worn Rubber Washers and Gaskets
Once you’ve removed the spindle assembly, examine the rubber washer at the bottom. If it’s visibly cracked, hardened, or flattened, replacement is necessary.
The washer sits on top of the valve seat, the metal surface it presses against when the tap is closed. Inspect the valve seat for pitting or corrosion. A smooth, shiny valve seat indicates good condition. A rough, pitted, or corroded surface means the valve seat must also be replaced.
O-rings are rubber seals that prevent water from leaking around the spindle itself. If water leaks from around the handle rather than from the spout, the O-ring is likely worn. O-rings are tiny (usually 3-8mm in diameter) and cost £3-5 for an assorted pack.
Step-by-Step O-Ring and Washer Replacement
Step 1: Remove the old washer and O-rings. The rubber washer sits in a recessed area at the bottom of the spindle. Use a flathead screwdriver to gently prise it out. O-rings sit in grooves around the spindle and can usually be prised out with a fingernail or screwdriver.
Step 2: Clean the spindle and valve seat. Use an old toothbrush or soft cloth to clean away mineral deposits or debris.
Step 3: Install the new washer. Select a replacement washer that matches the size of the old one. Press it into the recessed area, ensuring it sits flat and fully seated.
Step 4: Install new O-rings. Slide the new O-rings into their grooves, ensuring they sit evenly all the way around. If difficult to install, apply a tiny amount of plumber’s grease to help them slide into place.
Step 5: Apply plumber’s grease. Before reassembling, apply a thin layer of plumber’s grease to the spindle and valve seat.
| Component | Typical Cost | Lifespan | Replacement Difficulty |
|---|---|---|---|
| Rubber washer | £1-3 | 5-10 years | Very easy |
| O-ring | £2-5 per pack | 5-8 years | Easy |
| Ceramic disc cartridge | £35-60 | 10-15 years | Moderate |
| Valve seat | £5-15 | 15+ years | Moderate |
Reassemble the Tap and Test for Leaks
With new components installed, carefully reassemble the tap in reverse order.
Step 1: Reinstall the spindle assembly. Carefully insert the spindle back into the tap body, aligning it with the hole in the valve seat. Use your adjustable wrench to tighten the large nut underneath the sink, turning it clockwise until snug. Don’t overtighten.
Step 2: Reinstall the handle. Slide the handle back onto the spindle and insert the hex bolt or screw. Tighten until secure but don’t force it.
Step 3: Reinstall the decorative cap. Press the cap back into place until it clicks or sits flush.
Step 4: Open the isolation valves. Slowly turn the isolation valves counterclockwise to restore water pressure. Open them fully.
Step 5: Test the tap. Turn the tap on and let water run for 10-15 seconds. Check for leaks around the base, under the sink, and at all connection points. If you see drips, turn off the tap and tighten any loose nuts slightly.
If leaks persist after reassembly, stop and consult the tap manufacturer’s documentation or call a professional.
Plumber Cost for Leaking Tap UK: When to Call a Professional
A professional plumber in the UK typically charges between £80 and £150 for a simple tap repair, depending on location and complexity. Emergency call-outs often cost 50% more.
For straightforward repairs like washer or O-ring replacement, the DIY approach saves money, parts cost £5-15, and you invest only your time. However, call a professional if: the isolation valves won’t turn or are leaking, the tap body is severely corroded, you can’t identify which part is causing the leak, the tap is a designer model with proprietary parts, or you’re uncomfortable working with water systems.
DIY is appropriate if: you have basic tools and some confidence, the leak is clearly from the spout, your tap is a standard design from a major manufacturer, and you have time to research your specific model online.
At Apex Gas & Heating Ltd, we often receive calls from customers who’ve attempted DIY repairs and encountered problems. We’re happy to help, whether providing guidance over the phone or handling the entire job. Our team provides transparent pricing and fast response times across Sussex and Surrey.
Repair vs. Replace: Sustainability and Long-Term Savings
Before investing in repairing an older tap, consider whether replacement makes financial sense. A new kitchen tap costs £40-150, and professional installation typically runs £60-100. If your current tap is over 15 years old, has multiple failing components, or requires specialist parts that are difficult to source, replacement may be more economical.
Modern taps are also more water-efficient than older designs, reducing consumption by 20-30% and lowering utility bills over time. However, if your tap is relatively new (under 10 years old) or only one component is failing, repair is almost always the better choice.
Leaking kitchen taps are frustrating, but they’re also one of the most manageable household repairs. By identifying your tap type, gathering the right tools, and following a methodical approach, most homeowners can fix a leaking tap in under two hours. If you’d prefer professional help or encounter complications, Apex Gas & Heating Ltd offers fast, reliable plumbing services across Sussex and Surrey. Our team can diagnose the problem, source the correct replacement parts, and complete the repair with minimal disruption to your home. Get a quote today and have your kitchen tap running perfectly again.
Frequently Asked Questions
What causes a kitchen tap to leak, and can I fix it myself?
Kitchen taps leak most often due to worn rubber washers, damaged O-rings, or a faulty ceramic disc cartridge inside the tap body. Most homeowners can fix a leaking kitchen tap themselves if the damage is to the washer or O-ring. You'll need basic tools like an adjustable wrench and hex key, plus replacement parts available from any DIY store. However, if the valve seat is damaged or the cartridge is beyond repair, you may need a plumber. Always isolate the water supply first using the isolation valve beneath the sink.
How much does it cost to fix a leaking kitchen tap in the UK?
The cost to fix a leaking kitchen tap in the UK depends on whether you repair it yourself or hire a plumber. DIY repairs typically cost £5-£20 for replacement washers, O-rings, and gaskets from a local plumbing supplier. If you need a new ceramic disc cartridge or monobloc tap assembly, expect £15-£50 for the part. Professional plumber call-outs vary by region and urgency; contact Apex Gas & Heating Ltd for transparent pricing on emergency or routine repairs in Sussex and Surrey.
What's the difference between fixing a compression tap and a ceramic disc tap?
Compression taps use rubber washers and a valve seat to control water flow; they leak when the washer wears out or the seat becomes damaged. Ceramic disc taps use a sealed cartridge with ceramic discs instead; they rarely leak but cannot be partially repaired and typically require full cartridge replacement. Monobloc taps often use ceramic disc technology. Compression taps are easier to repair with basic tools, while ceramic disc taps are more durable but costlier to fix. Identify your tap type before starting to ensure you buy the correct replacement parts.
How do I know which tools and replacement parts I need?
Start by identifying your tap type: monobloc or traditional. For compression taps, you'll need an adjustable wrench, hex key, and replacement rubber washers and O-rings. For ceramic disc or cartridge taps, you need an adjustable wrench and a replacement cartridge specific to your tap model. Check the tap manufacturer's name on the body or base, then search for the part number online. Bring a photo of your tap to a plumbing supplier, or visit Apex Gas & Heating Ltd for guidance on the correct parts and tools for your specific tap model.
[EXTERNAL_LINK: Water UK guidance on fixing household leaks | water.org.uk]
[EXTERNAL_LINK: Plumbing standards and best practices from the Institute of Plumbing | plumbersinstitute.org.uk]
[EXTERNAL_LINK: Consumer guidance on hiring plumbers and understanding plumbing costs from Which? | which.co.uk]
Leave a Reply